So you want to build a Raspberry Pi cluster.
The first thing to do is determine the size of a cluster you want to build. You can go with any number greater than one, but I’ve found that 4-8 is a good sweet spot between too few nodes to get a real feel of cluster operation and too many nodes to manage and maintain. For this and following posts, I will be assuming a cluster of 4 nodes (node01 to node04).
Hardware
To run a cluster you also need some supporting hardware, where N is the number of nodes (examples given as links):
- N Raspberry Pi 4
- N Micro SD Cards (16GB or more preferred)
- 1 gigabit ethernet switch (at least N+1 ports) OR router with N LAN ports (see the Networking section below)
- N short “patch” ethernet cables
- Power Supply (choose one)
- N USB C power supplies
- N/4 4-port USB power supplies with N USB C cables
- N/4 BitScope Quattro Raspberry Pi blades and power supply
- 1 USB Drive [optional]
- 1 4-slot case (with heatsinks) [optional]
- 1 power strip [optional]
While you can use older models of the Pi if you already have them, using the most recent version will provide the most performance at the same price. Just make sure you get power cables that are compatible with your nodes.
You can also use larger RAM versions, but any amount of RAM should work for a minimally functional cluster. The more memory on your nodes, the larger problems they can solve and more performant they can be (caches for network and local storage and a reduction in swappiness).
Put together the nodes
If you got the BitScope Quattro for power or a case for your Pis, you will want to to get your Pis in place. This is also a great time to put on any heatsinks you have for your Pis.
I would also recommend taking this time to decide the identity of each node and labeling them with a number or other identifier. I’ve decided to use numbers to identify my nodes, so I will use a marker or label to indicate which node is which number. This makes troubleshooting easier later on.
Connect the wires
Once your Pis are all ready to go, we need to connect them to power and network. It is useful to connect power and network cables in the order of the Pis so troubleshooting is easier when something goes wrong. Be sure to make sure all the cables are fully inserted.
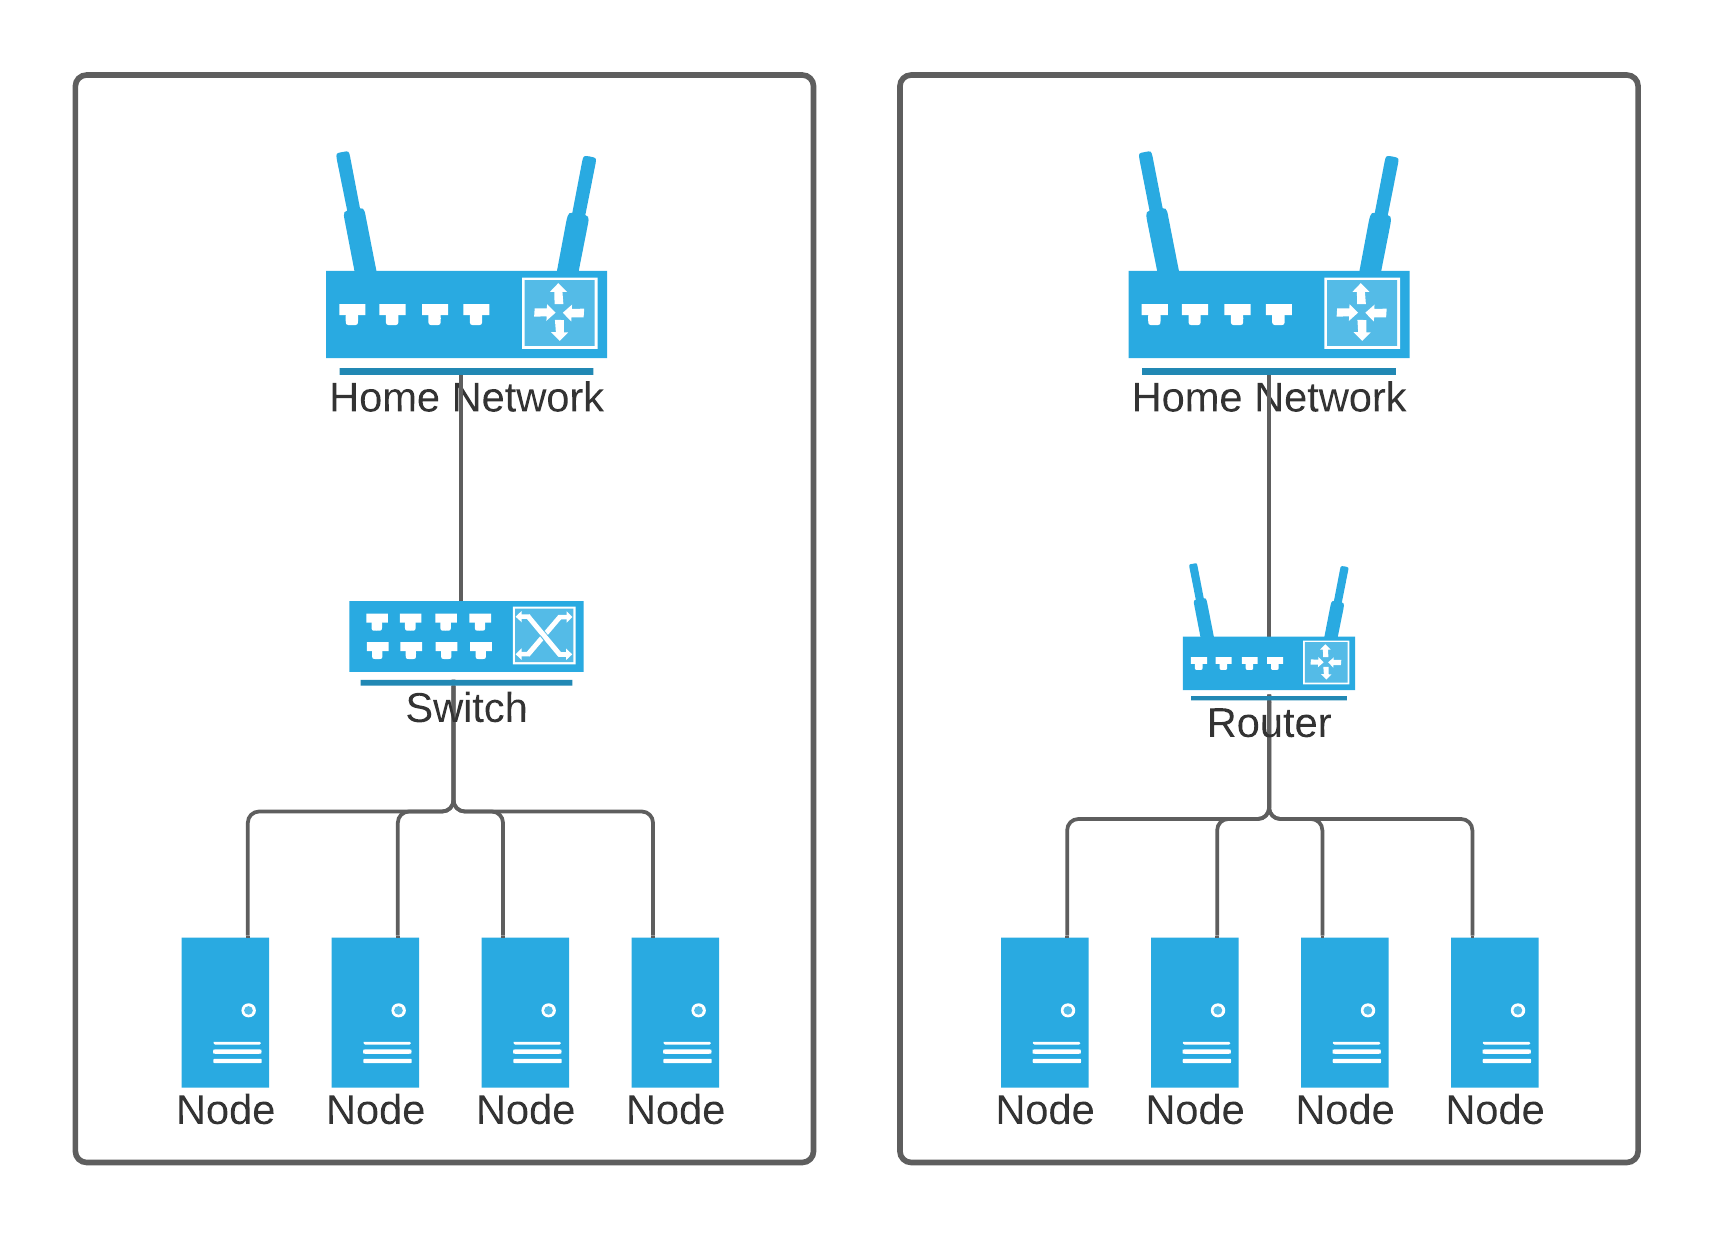
Networking Connections
For networking, you can take two paths:
- Use just a switch and connect the cluster to your home network
- Use a switch and/or a router to create a dedicated sub-network for your cluster. (You can use a switch to connect more nodes to your router if you have run out of ports on it)
I’ll be doing the second option as it give better separation from my other devices and allows me to set private IP addresses for my nodes regardless the IPs already in use on my home network.
Regardless the path your choose, you will need to connect your switch or router’s WAN port to your home network so your cluster can access the internet and you can access your nodes. (You could also have your cluster completely air-gapped and use static IPs on the nodes, but not being able to download applications and tools is in my opinion not worth the effort).
Software
For this cluster I will be using Ubuntu. Canonical ( the company behind Ubuntu) has done a great job of ensuring Ubuntu is stable on Raspberry Pis (with the help of software from the Raspberry Pi Foundation) and has a 64 bit version available (unlike Raspberry Pi OS as of the time of writing). I will be using 20.04, but the latest LTS version should be fine.
There is already a great tutorial on how to install Ubuntu on a Raspberry Pi. Make sure to select the latest LTS version with 64 bit support. Also, we have no need to install a desktop, so you can skip that step.
Connecting to the nodes
If you followed the above tutorial, you should have the IP address of all your nodes. If you can’t tell which IP goes to which node, try unplugging the network cables from all but one node, follow the instructions, and repeat for all the other nodes. If you are using a router for your cluster, make sure you are connected to its network (its WiFi or LAN port) and not your home network as the router will block connections from your home network into your cluster network. (if you want, you can create a port forward on your cluster router for port 22 to your so you can SSH into)
Once you know what node is what IP address, connect to the first node (which we will use as our head node). Try running ping 1.1.1.1 to ensure your node can connect to the internet. Then follow the cluster SSH guide to setup SSH between all your nodes.
Static IP addresses
No matter if you have a dedicated cluster network or it is connected to your home network, you should configure static IP addresses for all your nodes so their addresses will not change accidentally in the future.
Packages
In future posts we will install needed packages for configuring our cluster operation, but below are some useful packages that can help with troubleshooting and analyzing cluster performance.
Don’t forget to sudo apt update to make sure you have the latest package database.
- htop
- iftop
- iotop
- dstat
- pv